Non-English Keyboards
Windows XP
View Windows 2000/NT Instructions
Below are the instructions for Windows XP which is currently in the Student Computing Labs. Most language keyboard utilities have been installed in the lab (and are preinstalled on home computers), but need to be activated.
PLEASE NOTE : Once you activate the following settings, they will permanently appear in your settings every time you log in.
This Page
- Available Keyboards & Applications
- Activate Language Bar
- Activate U.S. International Keyboard
- Activate Russian, Central Europen and Greek Keyboards
- Install and Activate East Asian, Right-to-Left, Complex Script Keyboards
- Switch Keyboards in Applications
- Typing Right-To-Left ( RTL ) Languages in Word
- Microsoft Visual Keyboard Utility
- Keyman 6 and Additional Unicode Keyboards
- Character Map (New Page)
Available Keyboards and Applications
The following keyboards are available by default from Microsoft
- Most Western European (Spanish, French, German, Italian and so forth)
- Most Central European (Polish, Hungarian, Czech, Slovak, and so forth)
- Most Baltic Languages (Lithuanian, Estonian, Finnish, and so forth)
- Modern Greek
- Cyrillic - Russian, Ukrainian, Belarusian, Bulgarian and so forth.
The following keyboards are available from Microsoft, but must be loaded from the system disk first
- East Asian (Chinese, Japanese, Korean, Vietnamese, Thai)
- Hebrew
- Arabic, Farsi (Persian), Urdu
- Other Middle Eastern: Syriac, Georgian, Armenian, Syriac
- Indian Scripts: Hindi,Sanskrit, Tamil, Gujarati, Divehi
Some keyboards are available only with Service Release Pack 2 (SP 2)
- Undersupported South Asian scripts such as Bengali, Malayalam and Oriya
Software Compatibility
Microsoft keyboards are compatible with Microsoft Office products, Dreamweaver and other recent applications, but may not work with older applications.
Activate Language Bar
This procedure activates the Language Bar utility which allows you to switch keyboards from your desktop.
- In the Student Computing Labs, click on the Windows Start menu on the lower left of your screen. Go to Settings » Control Panels » Regional and Language Options.
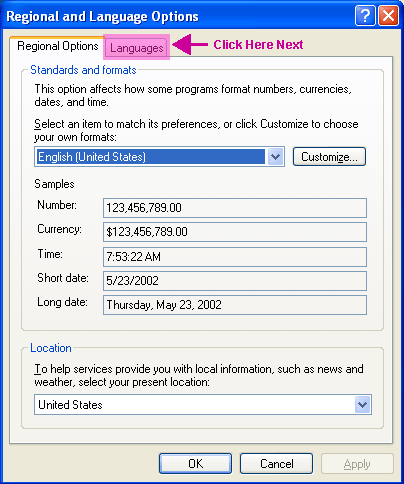
Home Computers - you may have to go to Start » Settings » Control Panels to open the Control Panels window, then click on the Regional and Language Options icon. - In the Regional Options window, click on the Language tab on the top.
- Click the Details button to open the Settings window.
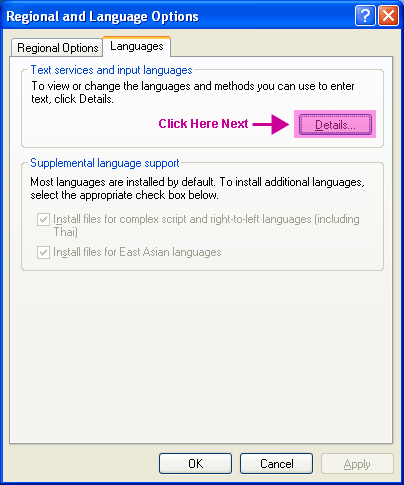
Language Tab. Click on Details next.
- Click on the Language Bar button at the bottom to open the Language Bar Settings window.
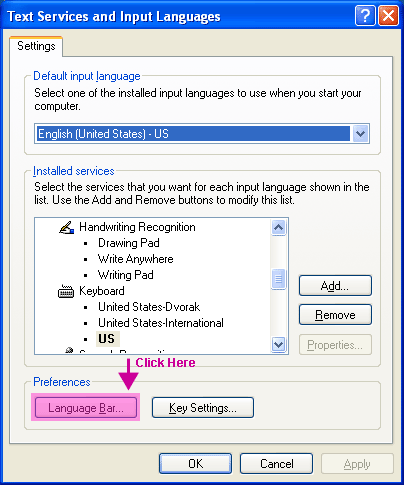
Language Settings window. Click on Language Bar to activate.
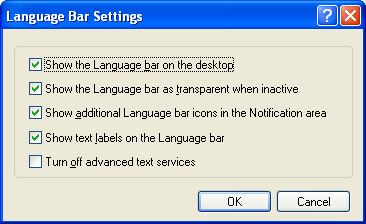
- Check the option Show the Language bar on the desktop, then click OK to close the window.
NOTE: You can click Show Text Labels to show the full label. Otherwise only icons (e.g. for English) will be shown.
- To activate different keyboard utilities, click on the Add button in the Settings window and follow the instructions in the Activate Input Locale Keyboards section below. Otherwise click OK for all the Control Panel windows.
NOTE: If you close a window without clicking OK, none of the settings will be changed. - You should see a blue toolbar on the top of your desktop. The Language settings is to the far left.

Language Toolbar set to Russian.
Activate the U.S. International Keyboard
The U.S. International keyboard allows users to type accents with the apstrophe key, quotes key and so forth. To activate it
- Make sure the Language Bar as been activated.
- Student Computing Labs: Click on the Windows Start menu on the lower left of your screen. Go to Settings » Control Panels » Regional and Language Options.
Home Computers: Go to Start » Settings » Control Panels to open the Control Panels window, then click on the Regional and Language Options icon. - In the Regional Options window, click on the Language tab on the top.
Regional and Language Settings Control Panel. Click on Language tab.
- Click the Details button to open the Settings window.
Language Tab. Click on Details next.
- In the Settings window, Click on the Add button to open the Add Input Locale window.

- From the Input locale pull-down list, select English (United States). Select United States-International from the Keyboard IME menu. Codes for the U.S. International keyboard are also available on this Web site.
Settings Input Locale Settings for the International Keyboard. - In the Settings window, you should see the new language or keyboard listed in the Input language menu. If you want the added language to be the default, then choose that language from the Default input language pull down menu.

Language Settings window. Use top pull-down menu to set default keyboard for your machine.
- If you want to set keyboard shortcuts to switch between multiple keyboards, make sure you are in the Settings window (shown in Step #4) , then click the Key Settings button on the bottom to open a new window. Adjust the keyboard sequence as desired.
- Click OK to close the Regional Options windows.
NOTE: If you close a window without clicking OK, none of the settings will be changed.
Activate Russian, Central European and Greek Keyboards
This is similar to activating the U.S. International Keyboard above.
- Make sure the Language Bar as been activated.
- Student Computing Labs: Click on the Windows Start menu on the lower left of your screen. Go to Settings » Control Panels » Regional and Language Options.
Home Computers: Go to Start » Settings » Control Panels to open the Control Panels window, then click on the Regional and Language Options icon. - In the Regional Options window, click on the Language tab on the top.
- Click the Details button to open the Settings window.
- In the Settings window, Click on the Add button to open the Add Input Locale window.
- From the Input locale pull-down list, select the language desired.
- Check the Keyboard IME menu to see if variant layouts are available (e.g. Polytonic Greek).
- In the Settings window, you should see the new language or keyboard listed in the Input language menu. If you want the added language to be the default, then choose that language from the Default input language pull down menu.
- If you want to set keyboard shortcuts to switch between multiple keyboards, make sure you are in the Settings window (shown in Step #4) , then click the Key Settings button on the bottom to open a new window. Adjust the keyboard sequence as desired.
- Click OK to close the Regional Options windows.
NOTE: If you close a window without clicking OK, none of the settings will be changed.
Install and Activate East Asian and Complex Script Keyboards
Because Asian and Middle Eastern scripts differ from alphabets, they are considered "complex scripte" and may require additional utilities to be installed from a Windows System CD-ROM. After that, the procedure is similar to activating the U.S. International Keyboard above.
Step 1 - Activate Language Bar
Make sure the Language Bar as been activated then click OK.
Step 2 - Install East Asian and Complex Script Utilities
Student Computing Labs - The utilities are installed in the University Park Student Computing Labs, but students must install the utlities by going to the Start menu then International Language Support » Microsoft Office » Microsoft Office Asian Character Input Support.
Home Computers - Several Chinese keyboards are available in Windows, but you may have to install it from the Windows System disk because it is a complex script. Follow the instructions below.
- Go to Start » Settings » Control Panels to open the Control Panels window, then click on the Regional and Language Options icon.
- In the Regional Options window, click on the Language tab on the top.
- In the Languages tab see if the options for "complex script and right-to-left languages" or "East Asian languages" are checked. If they are checked, proceed to Step #6.
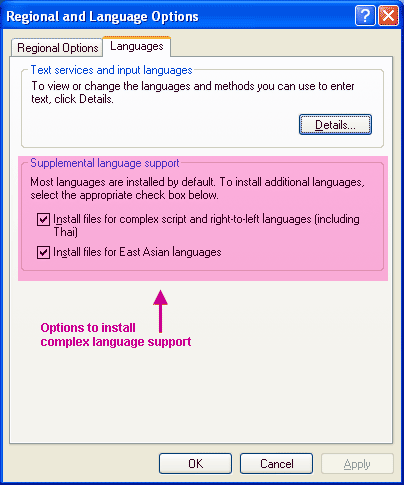
Language Tab of Regional Control Panel with checks to install complex languages.
- If the complex script options are not checked, then find your Windows XP System disks or ask your tech support person to install the items from the disk.
- Check the options for the scripts needed. You will be asked to insert the CD-ROM with the system files. The install may take few minutes and will require you to reboot the machine.
Step 3 - Activate Keyboards
- Once all the scripts have been installed, click the Details button in the Languages tab to open the Settings window.
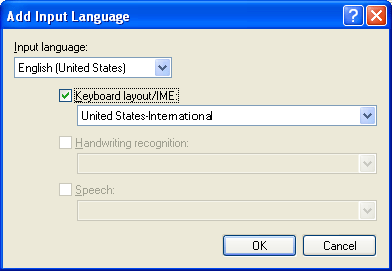
- In the Settings window, click on the Add button to open the Add Input Language window
- From the Input language drop-down list, select a language from the drop-down menu, then a Keyboard Layout/IME corresponding to the language keyboard you wish to activate. Click OK to close the Input window.
- Back in the Settings window, you should see the new language or keyboard listed in the Input language menu. If you want the added language to be the default, then choose that language from the Default input language pull down menu.
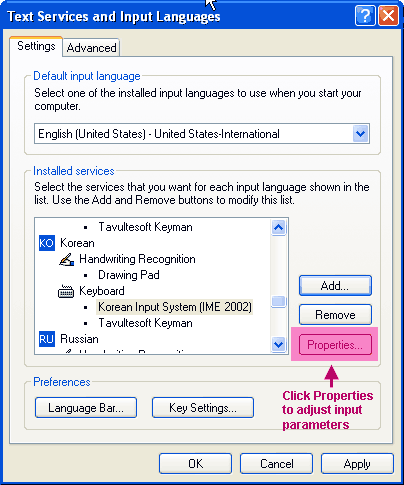
- If you have selected an East Asian language, click the Properties button on the right and adjust the input menus as needed. Click OK to exit that window.
- If you want to set keyboard shortcuts to switch between multiple keyboards, make sure you are in the Settings window (shown in Step #4) , then click the Key Settings button on the bottom to open a new window. Adjust the sequence as desired.
- Click OK to close the Regional Options windows.
NOTE: If you close a window without clicking OK, none of the settings will be changed.
Switch Keyboards in Applications
This step assumes that you have activated the Language Bar and activated your keyboards. See the sections above for details.
- Make sure a Language Bar is visible on the top of your desktop. If there is none visible, then follow the instructions for activating the Language Bar.
Language Toolbar set to Russian. Your toolbar may be set to English. - Open an application such as a word-processor, HTML editor, spreadsheet or any other application in which you need to input text.
- Select the appropriate language from the Language Bar drop down menu. If the language you want is not in the menu, then you need to activate that keyboard as detailed in the instructions in the previous section.
- For the International Keyboard, select EN English (United States) from the Language Bar, then United States-International from the Keyboard menu to the right. If there is no keyboard menu, then you need to activate it.

Language Bar for International Keyboard -
Begin typing in your document.
NOTE: For some keyboards such as Armenian, you may have to switch to another font such as "Arial Unicode."
Typing Right-to-Left (RTL) Languages in Word
In addition to activating a keyboard for Arabic or Hebrew, you may want to activate and use the Right-to-Left (RTL) and Left-to-Right (LTR) paragraph buttons in Microsoft Word.
To place the RTL and LTR buttons on a toolbar
- Open a recent version of Microsoft Word for Windows.
- Under the Tools menu, select Customize to open a pop-up window.
- Click on the Toolbars tab, then click on the New button to create a blank toolbar window. In the second New Toolbar pop-up window, fill in a descriptive Toolbar name such as "RTL", then click OK to close this window. A blank gray window should be open.
- In the first Customize pop-up window (Tools » Customize), click on the Commands tab.
- In the Categories menu to the left, scroll down and select All Commands.
- In the Commands menu to the right, scroll down and highlight Rtl Para (the button for Right-to-left paragraphs). Move this to the blank toolbar window.
- Scroll up to Ltr Para (the button for left-to-right paragraphs), highlight and move to the blank toolbar window.
- When you are finished click the Close button to close the Customize window.
- A new toolbar with the RTL (right-to-left) and LTR (left-to-right) paragraph buttons will be open. The RTL button is a paragraph symbol followed by a blue triangle; the LTR button is a paragraph symbol with the blue triangle before it.
 ( RTL button)
 ( LTR button)
To use the RTL and LTR buttons
- Open Microsoft Word and switch keyboards to Arabic or Hebrew. You may have to minimize or shrink your window in order to view the Language Bar on your desktop.
- The cursor will change so that text is typed from right to left. Press the RTL button () in the toolbar to move the cursor all the way to the right side of the page.
- To switch back to English, switch back to the English keyboard and press the LTR button ().
NOTE: You may be restricted to certain fonts such as "Times New Roman", "Arial" or "Tahoma".
Microsoft Visual Keyboard
The Microsoft Visual Keyboard is a utility which allows you to view the keyboard layout for each Input Locale within Microsoft Office applications.
You can download the utility onto your own computer from http://office.microsoft.com/downloads/2002/VkeyInst.aspx. Follow the posted instructions to install and use.
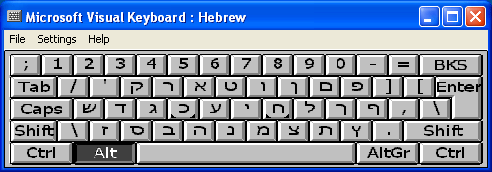
On the Student Computing Labs, the Visual Keyboard can be opened from Start » Microsoft Office » Microsoft Office Tools » Microsoft Visual Keyboard. Switch to the appropriate keyboard in the Language Bar to see its layout. Keys highlighted in white are typically "hot keys" for adding accents.
The image below shows a sample layout window of a Hebrew keyboard as seen in the Microsoft Visual Keyboard.
Keyman Unicode Keyboards
Tavultesoft has developed a utility called Keyman 6 which allows Windows users to install additional language keyboards not available from Microsoft. Keyman 6 is free for academic and commercial use. Tavultesoft also sells Keyman Deveioper which allows users to create custom keyboard layouts.
Links to Keyman compliant keyboards can be found at: